Walkthrough
The aim of the four Annotation scripts is to provide a way to edit Key-Value pairs (MapAnnotations) and Tags (TagAnnotations) by batch:
Import Key-Value pairs and Tags as Annotations from a CSV file
Export Key-Value pairs and Tags to a CSV file
Delete Key-Value pairs
Convert the Namespaces of Key-Value pairs
This walkthrough should give you an understanding of the scripts and help you to manage your annotations.
Object selection with the scripts
The object selection logic is the same for all four scripts. In OMERO there are two distinct hierarchies:
Projects → Datasets → Images
Screens → Plates → (Wells or Acquisition/Run) → Images
More details about selecting High-Content-Screening are given elsewhere (see Selecting High-Content-Screening).
The scripts offer 4 ways of selecting the objects to work with.
Direct selection
Simply select the all the desired objects. Opening the script after selecting the object will prefill the script parameters with the right object type and IDs:
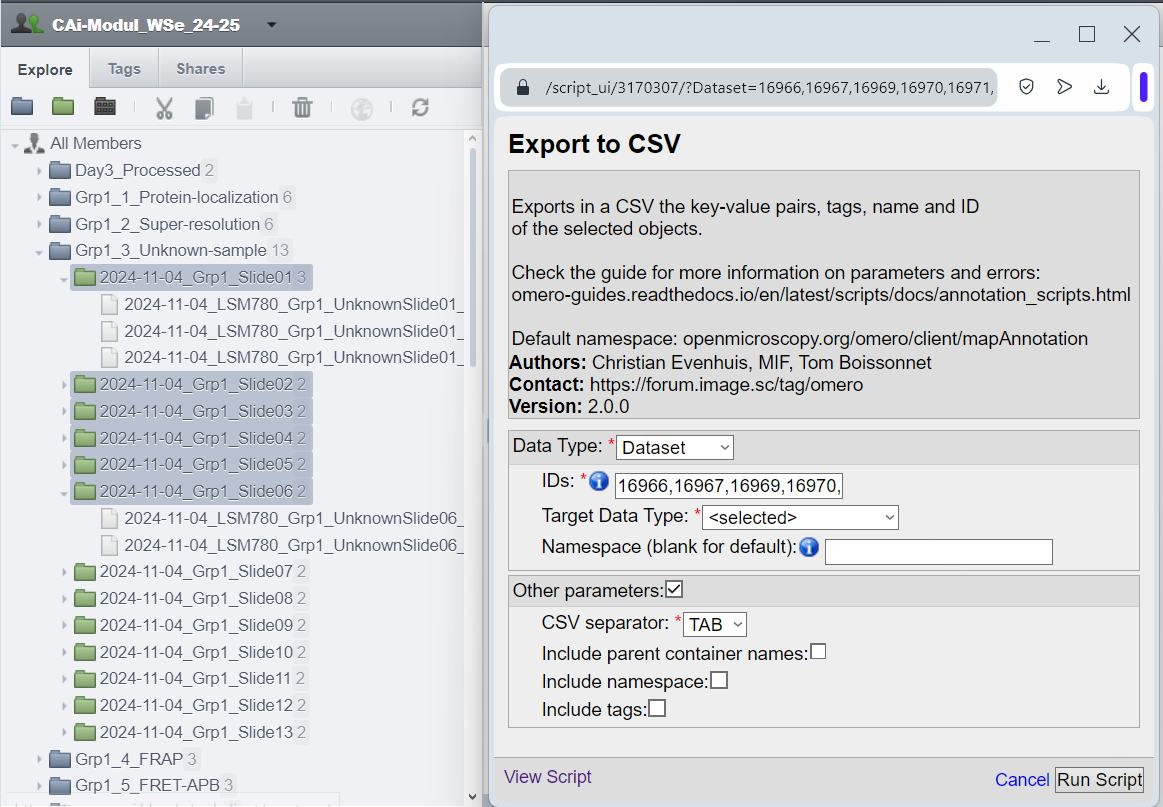
Selection of multiple datasets and the auto-filled Export to CSV script.
For the direct selection, leave the Target Data Type as “<selected>” (in this example, choosing Dataset would also work).
Children selection
Instead of selecting the objects one by one, we can select the parent object and indicate in the “Target Data Type” the children objects we want to select.
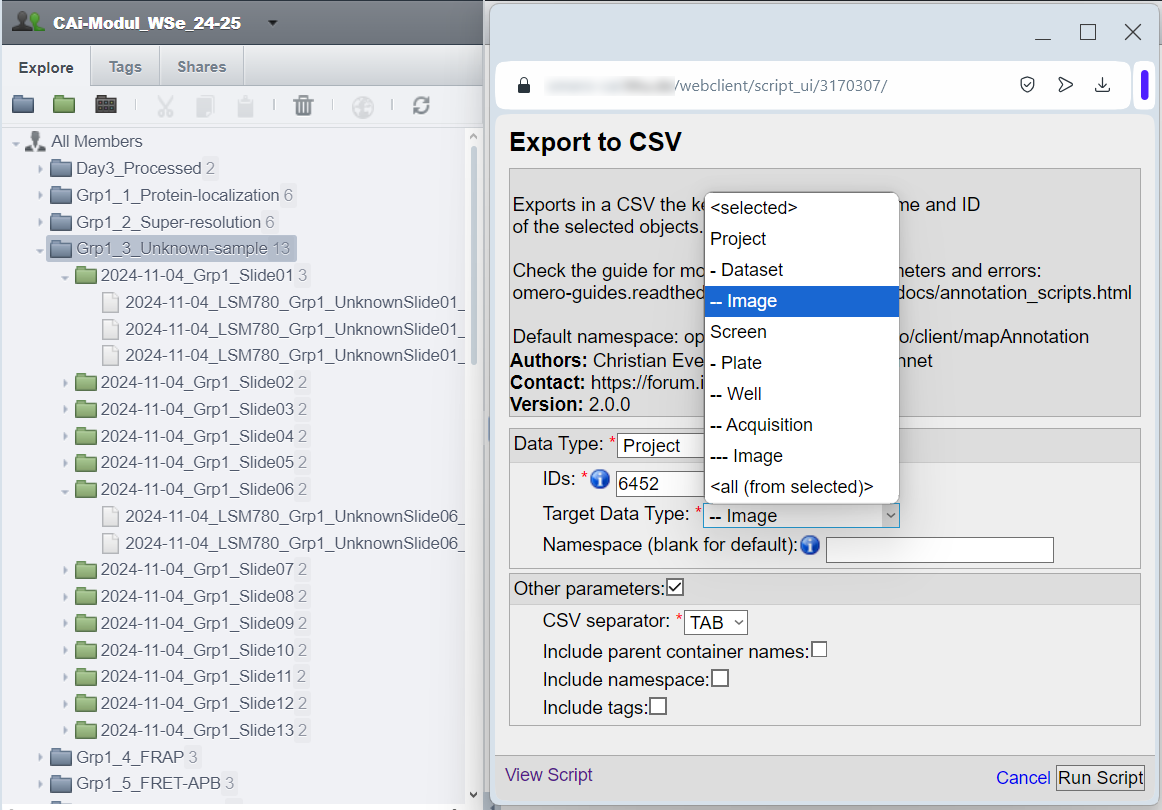
Selection of all the images of a project and the auto-filled Export to CSV script.
In this example, all the Images found under the Project:701 are selected.
Tag selection
You can use the Tags to select the images or other objects you want to work with. Do not confiuse this option with the exporting of Tags also provided by the scripts. The usage of Tags for object selection grants additional flexibility. You can for example select objects attached to different projects or belonging to different owners.
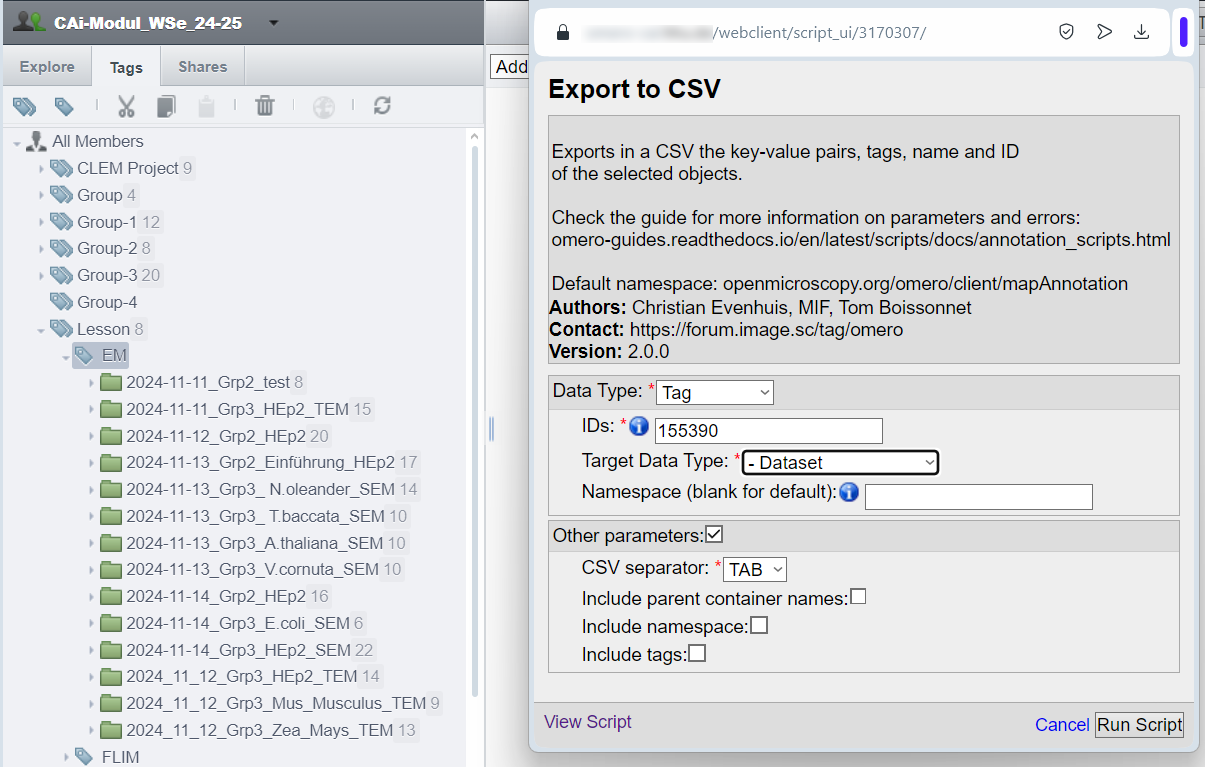
Selection of a subset of datasets from a Tag and the auto-filled Export to CSV script.
In this example, all the Datasets found under the Tag:155390 are selected. Note that choosing “<selected>” for “Target Data Type” will result in an error in this case.
All from selected
The fourth option is to apply the scripts to all of the selected objects and the children objects. Selecting a Project and using the option <all (from selected)> with result in applying the scripts to the selected project, to the linked datasets and the linked images bellow. Note that this option does not exist for the import of annotation from CSV.
Exporting annotations
Exporting annotations creates a CSV file with headers compatible with the import script. It can be used for:
Export Key-Value pairs (along with data like Namespaces and Tags) for modification or transferring annotations between groups.
Export a list of objects with their names and IDs (and excluding Key-Value pairs by specifying an unused Namespace).
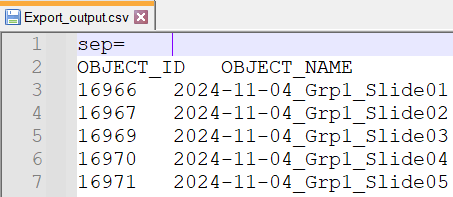
Exported CSV with only the object ID and name
Importing annotations
Starting from the file we exported as explained in the previous section, we proceed to edit it within a spreadsheet editor, adding more columns to the CSV, You can also insert a row on the top of CSV to specify the Namespace for each Key:

Result of populating the CSV shown in a text editor
We added several columns to annotate our dataset with Key-Value pairs following the REMBI guidelines (after saving the document, our TAB separator became ,).
We proceed and start the script “Import from CSV”.
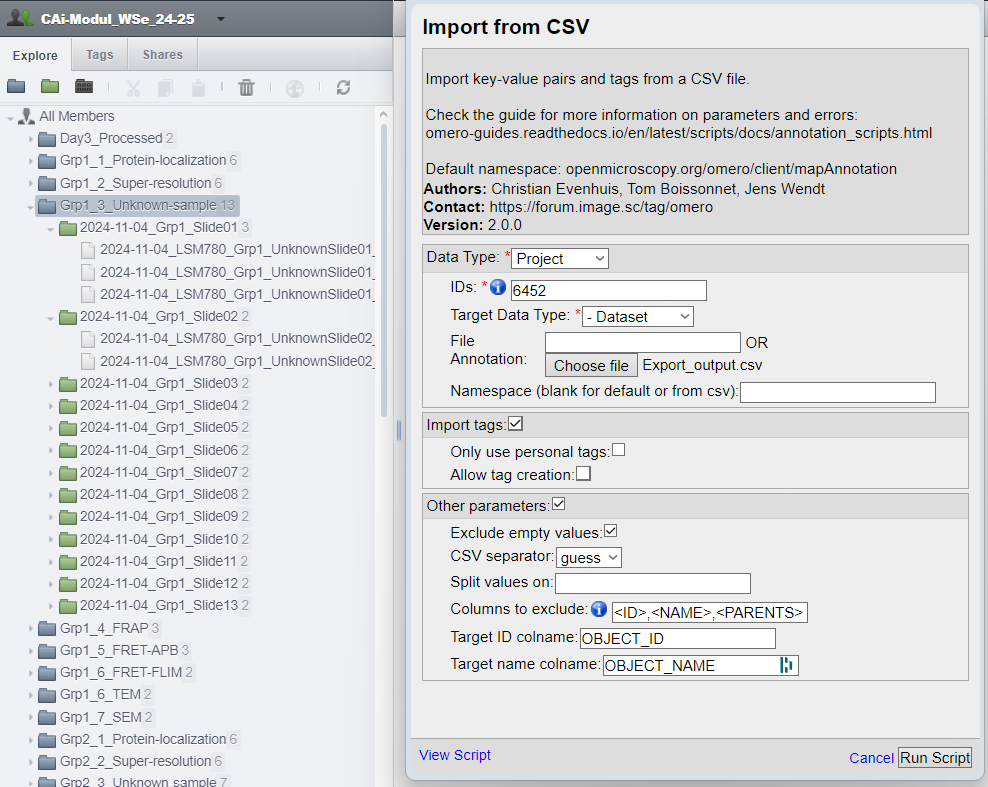
Selection of all the datasets of a project and the Import from CSV script.
There are many parameters here that could help you fine tune the way to import annotations. More on that in the parameter description section of this guide.
The Key-Value pairs were added to 5 datasets out of the 11 present in this project, as expected. We also obtain three sets of Key-Value pairs, one for each Namespace used in the CSV.
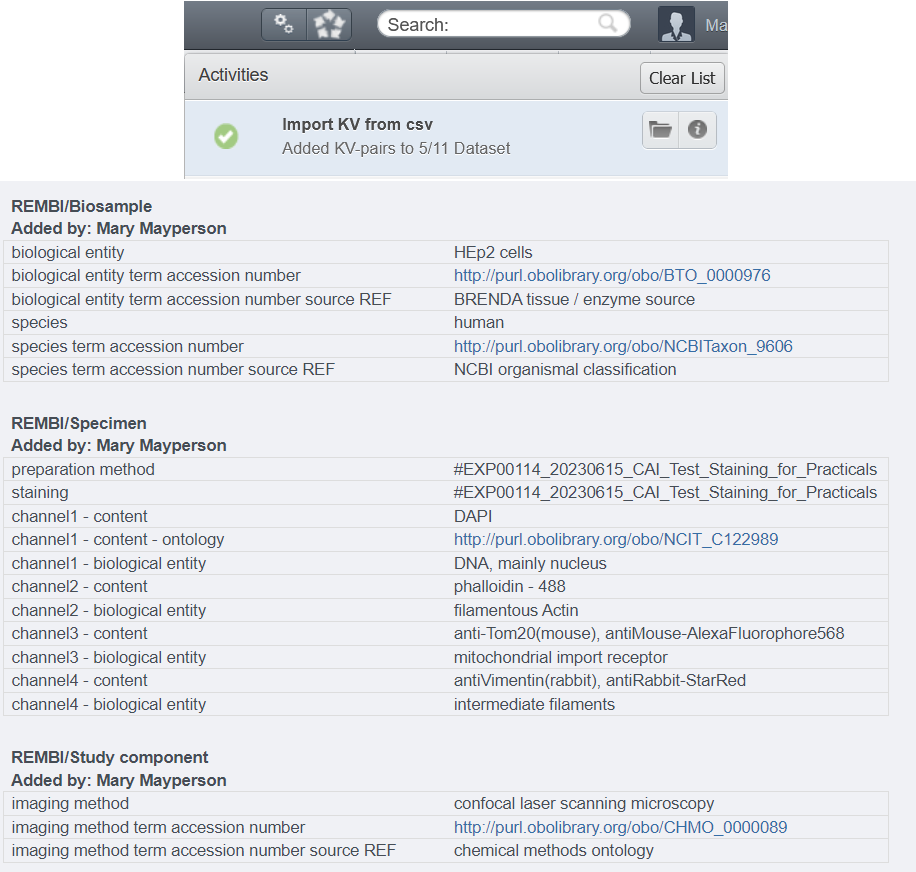
The script output (5 entries in the CSV matched to 5 dataset out of 11) and theresulting Key-Value pairs annotation.
Converting the Key-Value pairs Namespace
Key-Value pairs are grouped under categories called Namespaces. This allows flexibility to distinguish or isolate annotations, such as exporting or deleting only those associated with a specific Namespace.
Note
When you create Key-Value pairs in OMERO.web, you use Namespaces without noticing it: OMERO assigns by default the “Client namespace” (openmicroscopy.org/omero/client/mapAnnotation in full), a special Namespace recognized by OMERO.web.
The “Client namespace” (see note above) is the only Namespace that allows editing of Key-Value pairs in the OMERO.web interface. If a Key-Value pair uses a different Namespace, its Namespace must first be converted to the “Client namespace” before editing. These annotation scripts will always default to the “Client namespace” if the Namespace fields are left empty.
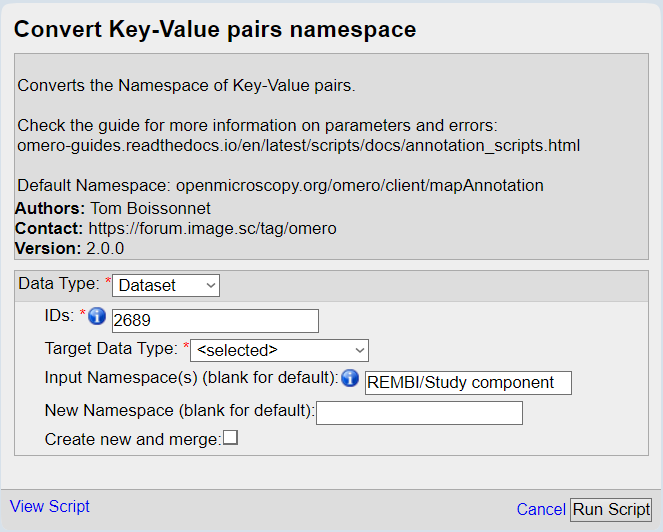
The script to convert the Namespace of Key-Value pairs annotations.
And here is our five Key-Value pairs annotations with converted Namespace:
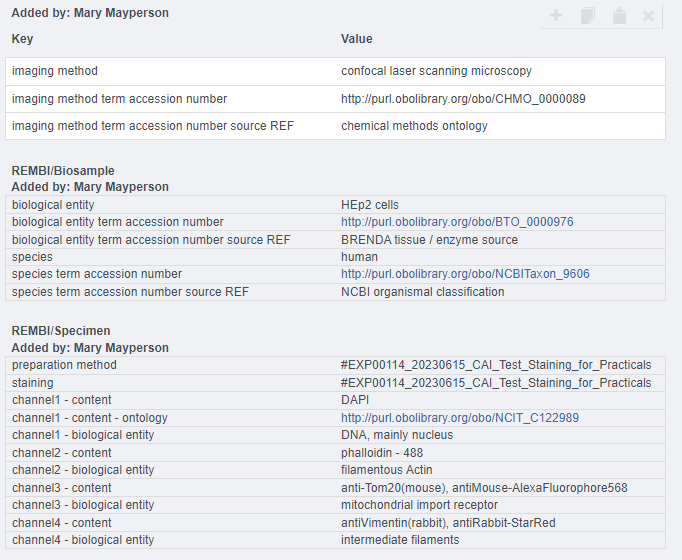
The script output (5 dataset had annotations with the default Namespace) and theresulting Key-Value pairs annotation.
Once the Key-Value pair has been converted to the “Client Namespace,” it can be edited in the OMERO.web interface.
Deleting Key-Value pairs
It turns out that there are more than a few edits to do on our Key-Value pairs, and converting back and forth the Namespace seems too tedious this time. Let’s instead export what we have so far (we have done edits that we don’t want to lose), delete “old” the Key-Value pairs, and reimport when we are done fixing them.
Using the same selection inputs for both scripts, we make sure that we have the Key-Value pairs on our computer before deleting them.
Warning
To export or delete multiple Namespaces simultaneously, you can use the * wildcard to include all Key-Value pairs, regardless of their Namespaces. However, use this feature with caution, as deleted annotations cannot be recovered without a backup.
Because there is no undo with the deletion of data from OMERO, think twice while checking the confirmation box and clicking the “Run script” button.
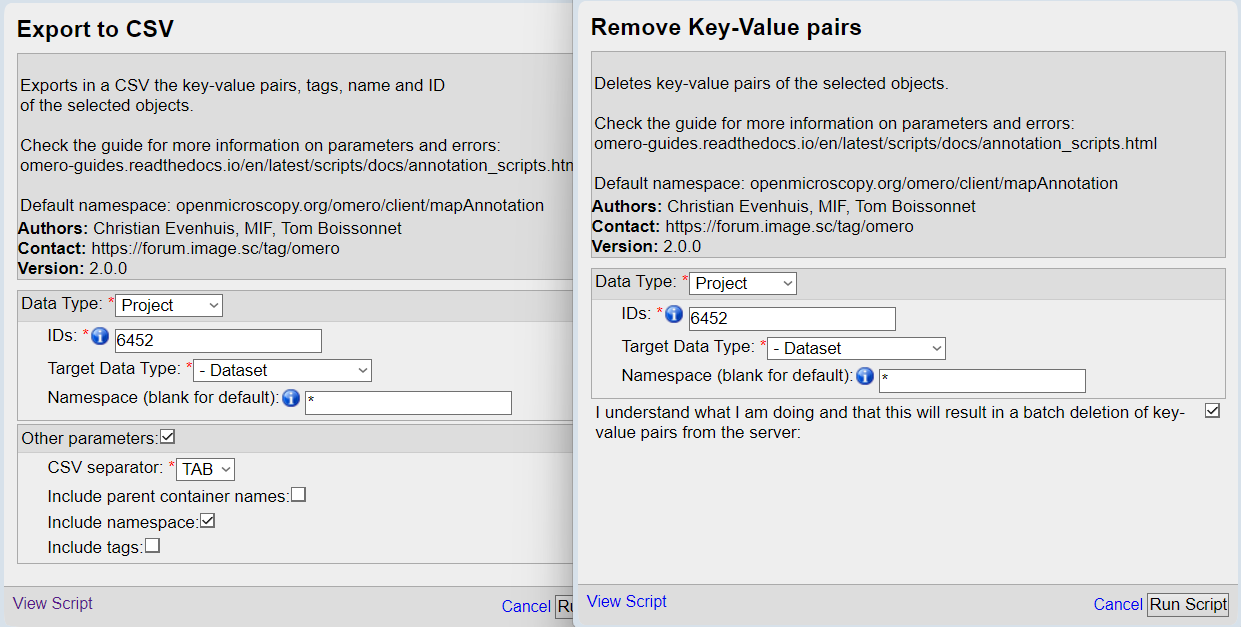
The two scripts used one after another. Export the annotations for backup before removing them from the server with the Remove KV script.
We can now make the necessary edits in the CSV file and reupload the Key-Value pairs!.
Make sure to check the extended guide to learn about what else you can do with those scripts.
- Authors:
Tom Boissonnet
- Version:
1.0 of 2024/03/01