Manual Segmentation
Description
The following workflows should work both with ImageJ and Fiji, after these have been correctly set up with the OMERO plugin for Fiji/ImageJ.
Using the User Interface of the OMERO plugin, we will show:
How to connect to OMERO using the OMERO plugin for Fiji/ImageJ.
How to open an image from OMERO.server into Fiji/ImageJ.
How to manually segment an image opened from OMERO in Fiji/ImageJ using the plugins Auto Threshold and Analyze particles in Fiji/ImageJ.
How to record this workflow in Fiji/ImageJ, using the Recorder plugin, for later use.
Setup
Fiji has been installed on the local machine with the OMERO.insight-ij plugin. The installation instructions can be found at How to install OMERO plugins for Fiji/ImageJ.
Resources
Samples images from the Image Data Resource (IDR) idr0021.
Step-by-step
Launch Fiji/ImageJ.
Go to Plugins > OMERO > Connect To OMERO. This will show a login screen where you can enter the name of the server to connect to, the username and password. The OMERO plugin will allow you to browse your data in a similar manner to OMERO.web.
In the OMERO login dialog, click the wrench icon
 and then
add the server address in the dialog. By default, only “localhost”
is listed. Click on the plus icon to add a new line to the list
and type into the line the server address.
and then
add the server address in the dialog. By default, only “localhost”
is listed. Click on the plus icon to add a new line to the list
and type into the line the server address.Click Apply.
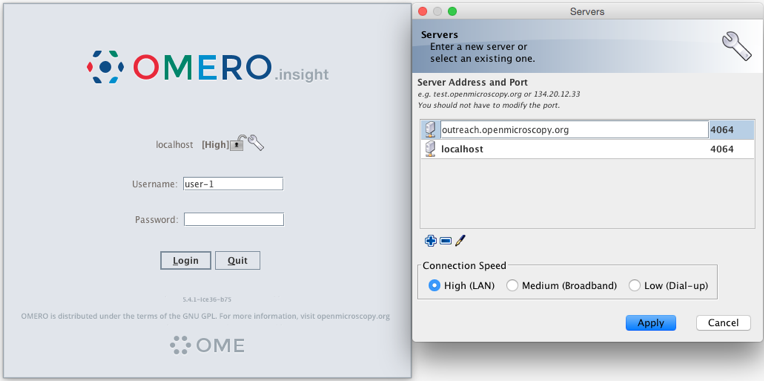
Enter your credentials and click Login.
Browse to the Project idr0021, open any Dataset and double-click once on an Image to open it in Fiji. Bio-Formats is used to view the Image.
Make sure to select View stack with: Hyperstack in the Bio-Formats Import Options dialog.
Note that each plane will be transferred from the server to the client machine so this may take a few moments.
To open the Recorder, go Plugins > Macros > Record…, select Macros to record the actions. The steps will then be used in the Scripting workflow.
Convert floating-point pixel-type to 8-bit using Image > Type > 8-bit.
Go to Image > Adjust > Auto Threshold, to open the Auto Threshold dialog:
Select MaxEntropy for the Method parameter.
Check the checkbox Stack.
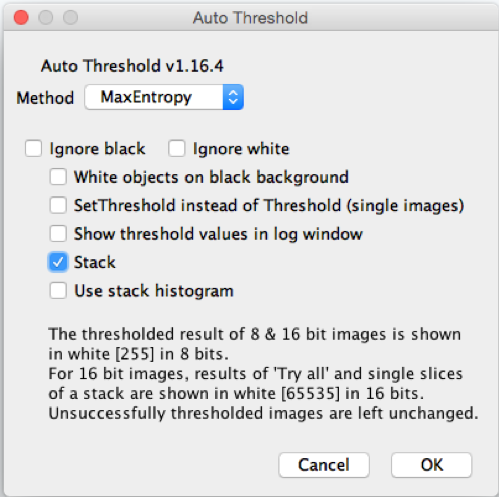
Click OK.
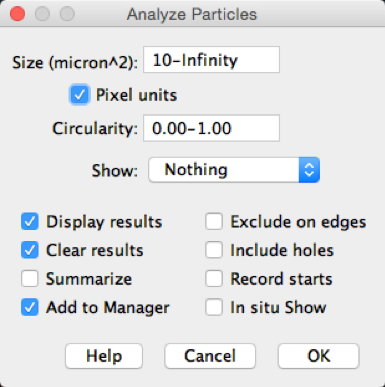
Then open Analyze > Analyze Particles….
In the dialog
Set Size to 10-Infinity and check Pixel units.
Check the following checkboxes:
Display results
Clear results
Add to Manager
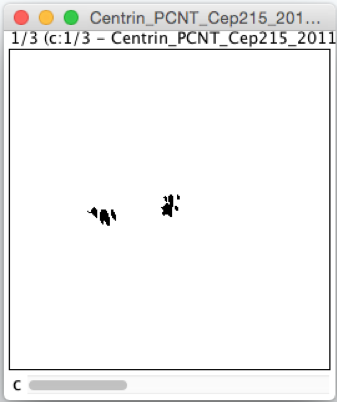
- Click OK then Yes in the popup dialog indicating asking to
Process all X images?.
To save the thresholded Image back to OMERO with the generated ROIs and the measurements:
Select Plugins > OMERO > Save Image(s) to OMERO.
Create a New Dataset for the image
Click the New… button next to the selection box on the Dataset row.
In the dialog that pops up, enter a name and a description (optional).
Click Create.
The newly created Dataset will automatically be selected.
Click Add to the Queue then Import.
Go to OMERO.web and check that the measurements have been saved in a CSV file and attached to the Images. The attachment can then be downloaded at any time.
- To save the recorded macro to OMERO.server:
In Fiji, find the Recorder window and click “Create”. A new window will pop up with the macro you just recorded. Verify the macro on a new image. Once the verification succeeds, just close the macro window and in the dialog which pops up select “Yes” to save the macro. Save the macro locally e.g. “your-macro-name.ijm”.
In OMERO.web, select the dataset you would like the macro to be run on and attach the “your-macro-name.ijm” macro you just recorded as file attachment to that dataset. The attachment can then be downloaded at any time. Also, the attached macro can be used by Fiji scripts - see example on threshold_scripting.html.