Administrate Groups and Users
Description
This chapter will show how to manage groups and users using the graphical interface in OMERO.web and the command-line interface. Most of the following tasks below can only be done by users with some administrator privileges. We will show:
How to manage groups, creating and editing a new/existing group.
How to manage users, creating and editing a new/existing user.
How to set up the OMERO server to be able to email all users.
Resources
Documentation:
Script for Command Line User/Group management
File defining the User/Group setup used by the script
Setup
No setup needed for OMERO.web administration panel (see Web Interface chapter below) except working OMERO.web.
Command Line interface installation
The installation instructions can be found at CLI installation.
Step-by-step
Administrate using the Web Interface
In your web browser, go to the server address provided.
Log in using the username and password provided.
In the top toolbar, click the
Adminbutton . Note that the
 Adminbutton is only available for users with certain privileges: administrators and administrators with restricted privileges. If you are a user or a group owner, navigate to the sectionWeb Interface: Users change their own settingsbelow.
Web Interface: Managing Groups
Click on the
Groupstab. You can search for groups if desired.To create a new Group, click on the
Add new Groupbutton. Note that theNameandPermissionsfields are mandatory.Click
Save.The new group will be shown in the list of Groups.
To edit a Group, click on the
Pencilbutton .
.You can add or remove members or group’s owners or change group permissions.
Before removing a user from a group, it is preferable to move their data to another group or transfer ownership of their data to another user. Having a data owned by someone who is not a member of the group is not desirable.
Click
Save.
Web Interface: Managing Users
Click on the
Userstab.You can search for users if you wish.
OMERO.web denotes the user categories using small helpful icons:
Users with administrator privileges have a
toolsicon .
.Active users have an icon with
blue circle .
.Inactive users have a
lockicon .
.LDAP users have a
red hexagon .
.
To create a new user, click on the
Add new User button.Mandatory fields are highlighted in red.
You can select the role of the user to be:
User(no special privileges).Administrator(this means full administrator).Administrator with restricted privileges.
If you choose the role to be
Administrator with restricted privileges, you must also select the privileges in a subsequent menu. Hover with mouse over the checkboxes to see short descriptions of the privileges. Creating an administrator with restricted privileges allows to give some limited rights to some trusted users e.g. to allow a facility manager to import data for other users. It is currently preferable to create users with such roles via the OMERO.web Interface. More aboutAdministrator with restricted privilegescan be found in this OMERO documentation section.Click
Save.To edit a
User, click on thePencilbutton to the right of the line with the name of the user. You can add/remove the Userto/from a group or modify the roles.Click
Save.
Web Interface: Users change their own settings
Note that these features are not limited to administrators, any user can change their settings in the manner described here. Furthermore, this is the preferred way for Group Owners to manage their groups.
In OMERO.web, click in the top-right corner of the webclient, click on your name, then, in the dropdown menu, click on
User settings.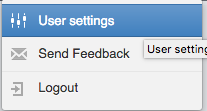
In the interface that appears, you can change your password and default group. Default group is the group you log in to by default when logging to OMERO. Your data in your default group is what you typically see immediately after loggging in for example to OMERO.web, whereas your data in your other (non-default) groups have to be explicitly navigated to.
For group owners only: You can now navigate to the group(s) you own by clicking onto
My Groupstab.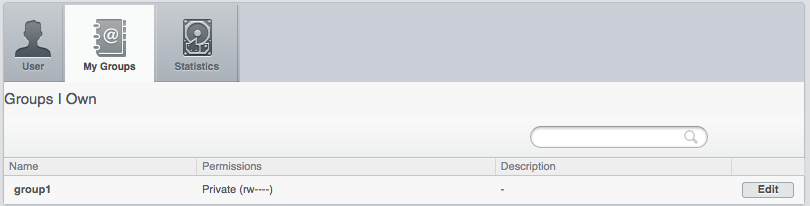
Identify the group you want to edit in your group list and click on
Editbutton.You can now add or remove group members, add members as group owners (a group can have many owners, besides youself). When removing users from the group, make sure that the data owned by a user is moved or transferred to another user before removing the user from the group.
You can also change the permissions level of your group. Note though that this is an action which needs careful thinking, especially if you are going from more permissive group types towards less permissive ones.
Administrate using the Command Line Interface (CLI)
Typically, the administration of Groups and Users in OMERO is done in OMERO.web (see section above), as it is more user friendly. The Command Line Interface (CLI) cannot offer the easy quick overview, filtering and searching and intuitively named buttons and tabs. For creation of administrators with restricted privileges, there are several key features missing from the CLI which are present in OMERO.web. Nevertheless, some features for handling LDAP users are implemented only in the CLI. Further, the CLI offers an environment in which custom bash scripts for user/group creation and maintenance can be executed. One example of such script can be taken from create_groups_users.sh. The script consumes a file create_groups_users_setup in which a certain user-group setup is defined.
Command Line: Managing Groups
By default when creating a group, its permissions level is set to
private. To create a new read-annotate groupLab1, run:$ omero group add Lab1 --type=read-annotate
Or, you can define the permissions of the new group in a different way:
$ omero group add Lab1 --perms='rwra--'
To list all the groups and save the output for example in a CSV file:
$ omero group list --style csv > groups.csv
To add an existing user
user-1to theLab1group and make that user a group owner (the option--as-owneris not needed when adding a member), run:$ omero group adduser user-1 --name=Lab1 --as-owner
Let us add
trainer-1as an owner of the group too:$ omero group adduser trainer-1 --name=Lab1 --as-owner
To remove
user-1from the list of owners (user-1will still be a member of theLab1group):$ omero user leavegroup Lab1 --name=user-1 --as-owner
Note that the previous command when run without the
--as-ownerflag would remove theuser-1from the group completely. Thus, it is an alternative to the following command.To remove
user-1from theLab1group, you can also run:$ omero group removeuser user-1 --name=Lab1
To edit the
Lab1group, first determine its ID:$ omero group info --group-name Lab1 id \| name \| perms \| ldap \| # of owners \| # of members -----+-------+--------+-------+-------------+-------------- 653 \| Lab1 \| rwra-- \| False \| 0 \| 0
Change the group name to
LabN:$ omero obj update ExperimenterGroup:653 name='LabN'
Let us reset the name back to
Lab1to simplify the rest of the workflow.Change the group’s permissions to read-write:
$ omero group perms --perms='rwrw--' --name='Lab1'
Command Line: Managing Users
Create a new user with login name
lpasteurand at the same time add this user (with first and last nameLouis Pasteur) to theLab1group:$ omero user add lpasteur Louis Pasteur --group-name Lab1
Let us now add the user to another group:
$ omero user joingroup Lab2 --name=lpasteur
To edit the user and for example add an email address, first determine the user’s ID:
$ omero user info --user-name lpasteur
Add an email address (supposing the ID of the user is
123):$ omero obj update Experimenter:123 email='lpasteur@demo.co.uk'
Make a user inactive. User cannot be deleted but it is possible to prevent a user from logging in. For that, we need to remove the user from the
usergroup (an internal OMERO group):$ omero user leavegroup user --name=lpasteur
To reactivate the user:
$ omero user joingroup user --name=lpasteur
Command Line: Managing LDAP Users
If LDAP authentication is configured on your OMERO.server, the OMERO.server synchronizes the user list with an LDAP server, thus enabling an easy user creation and maintenance. It is possible to convert non-LDAP OMERO users to LDAP authentication using the command omero ldap setdn. See further information in the links under the Resources section of this guide. See LDAP authentication and LDAP plugin design.
Typically, it is impractical to synchronize the OMERO groups with LDAP groups. In such case, the OMERO.server can be configured in such a way that LDAP users when they first log in to OMERO will be added to a specific private OMERO group (let us call this group My Data). This situation is further explored in the example below.
The administrator or administrator with restricted privileges can add an LDAP user to OMERO even before the user have ever logged in to OMERO:
First create the existing LDAP user as OMERO user. In the example below the user name is
enoether:$ omero ldap create enoether
The user is now a member of the
My Datagroup in OMERO. Then, if needed, add the user to theLab1group:$ omero group adduser enoether --name=Lab1
Note that it is advisable to clarify the OMERO group membership situation of the LDAP users soon after they joined OMERO. This can be done for example by adding the new user to their lab group (e.g.
Lab1) in OMERO as well and by changing the default group of such user in OMERO to be their lab group. See above for how to change the default group of a user. Otherwise, the new LDAP&OMERO users might be importing their data into theMy Datagroup for some period of time, without realizing the data are not accessible to their colleagues in the lab group for cooperative purposes becauseMy Datais a private group.
Set up OMERO server to email users
If you are a full administrator or an administrator with restricted privileges with any or no privileges, you can email OMERO users. This can be helpful for example to inform users about downtimes, new features or imminent changes regarding OMERO.
In cooperation with you OMERO.server system administrator, consult the documentation on email in OMERO.
Once the OMERO.server is configured, log in to OMERO.web and in the top toolbar, click the
Adminbutton.Click on the
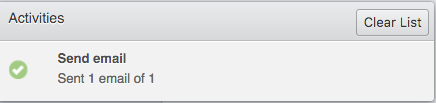
Emailtab.Choose the appropriate options, enter the email subject and message. Note that depending on the number of users you are choosing to email, the action might take a long time to finish. You must keep the session of OMERO.web alive (i.e. doing actions still being logged in OMERO.web) until the
Activitiesdropdown menu (icon to the left of theSearchin the top bar of OMERO.web) reports that all emails were sent.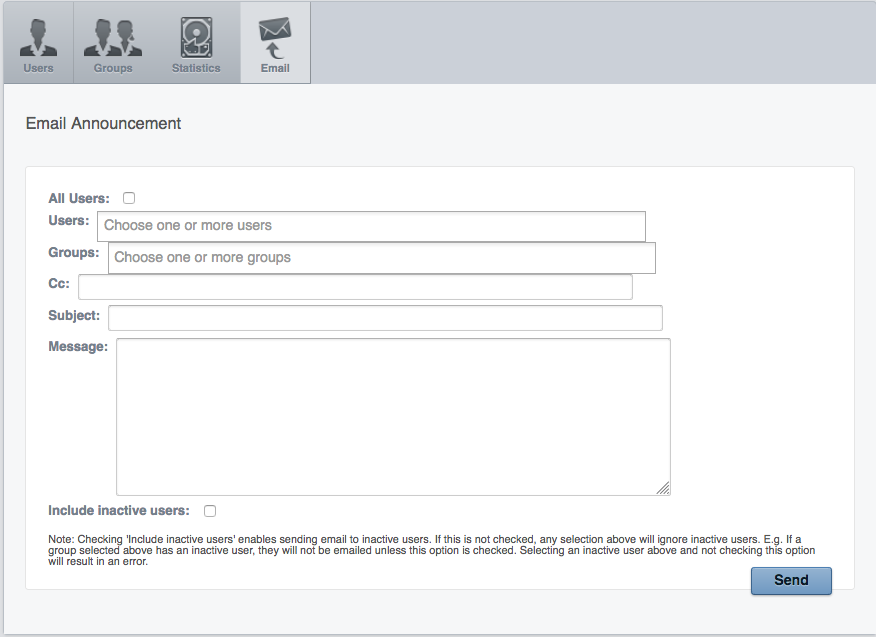
Click
Sendbutton.