View images in OMERO.iviewer
We introduce OMERO.iviewer, a 2D viewer which can open and browse multi-t, multi-z and multi-channel images and allows to draw and edit Regions of Interest. It also offers the ability to view several images at the same time and synchronize the view.
Description
We will show here:
How to open multidimensional images in OMERO.iviewer
How to change rendering settings in OMERO.iviewer and scroll through z and t
How to change the Lookup table and invert the displayed intensities for a particular channel
How to use the Histogram feature
How to zoom and rotate the image
How to create a maximum intensity Projection and save it
How to save a current viewport as png in OMERO.iviewer
How to use and synchronize multiple viewer windows inside OMERO.iviewer
Resources
Example files used
Note: Only some of the images in this dataset are z-stacks, for example
Setup
OMERO.iviewer installation
OMERO.iviewer is a pip installable application for OMERO.web. Follow the steps described in https://pypi.org/project/omero-iviewer/ to install it and configure the OMERO.web accordingly.
The walkthrough assumes that OMERO.iviewer has been set up as the default viewer for OMERO.web.
Step-by-Step
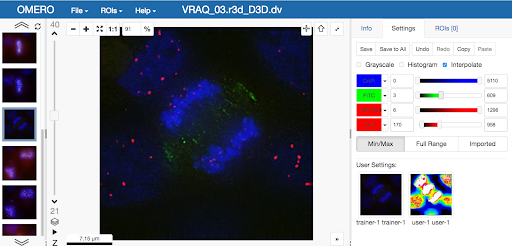
Double-click on an Image thumbnail, or click the
Full Viewer button in the right-hand pane to open an Image in a larger viewer called OMERO.iviewer. It is a Web app developed and released independently from the webclient. The OMERO.web framework can be extended with multiple apps to view data in different ways.
Zoom in and out of the image by using the
+and-buttons in top-left corner or by scrolling the mousewheel.Rotate the image by holding
Shifton your keyboard and then drag the image using the mouse.We can adjust the rendering settings and scroll through Z or T.
To change the Lookup Table (LUT) of a particular channel, click on the downward facing arrow next to the channel label
 .
.In the menu, select the LUT you wish to use. You can find here all the LUTs which are supported in ImageJ.
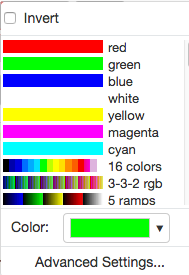
In the same menu, you can also invert the intensity of the channel by checking the checkbox on the top.
Still staying in the
Settingstab in the right-hand side of OMERO.iviewer, click on the checkbox next to theHistogramword near the top.
A histogram of the first channel which is on will appear. Note that when you move the rendering settings sliders beneath the histogram, the histogram updates to showing the channel you just manipulated.
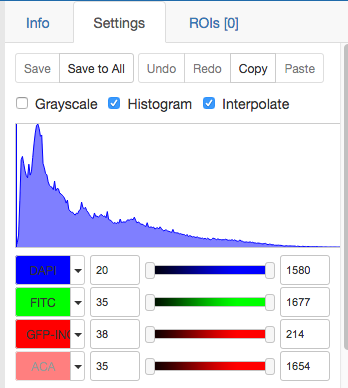
The
Interpolateoption provides a smoother rendering of the image in the viewer. Unchecking this will show the pixels at the same resolution as the original data. This option has no effect on the underlying pixel intensity values.Make a maximum intensity Projection of a z-stack by clicking the
stackicon in the bottom-left corner of the central pane, just under the z-slider.
Note that on the vertical z-slider, there are now two knobs. Adjust the knobs to select the desired portion of the z-stack to be projected. The central pane will show a preview of your Projection.
Save the Projection by selecting
File > Save Projection as new image. In the following dialog, click eitherNavigate to Image in WebclientorOpen Image in iviewer.Save the viewport by selecting in the top-left corner
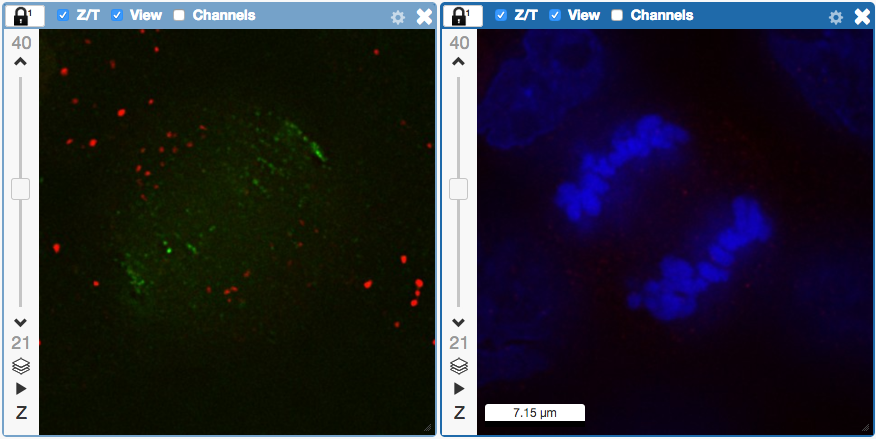
File > Save Viewport as PNG.Compare the two channels of one of the Images in multi-image view:
Double-click on the thumbnail of the already opened Image in the left-hand pane of the viewer. This will open the Image again in a new window.
Select one of the windows and in the right-hand pane switch the green channel off.
On the other window, switch the blue channel off.
Work with images in the multi-view mode. There are several ways to get full views of the images from the thumbnails in the left-hand column.
Clickon a thumbnail to open the corresponding image in the currently active central pane viewer window, replacing the image in that viewer window.Double-clickon a thumbnail to open a new central pane viewer window with the double-clicked thumbnail image.Drag and dropa thumbnail into an existing central pane viewer window to replace the image in that window with the image corresponding to the thumbnail which you just dropped into it.Drag and dropa thumbnail onto the white canvas area in the central pane to create a new viewer window.
We can synchronize the central pane viewers by adding them both to the same
sync Group.Click the
syncicon in the top-left corner and select the first option in the dropdown menu.
Repeat for the other viewer.
Now both Images have the
Z/TandView(zoom and position of viewport) synchronized.
Click on
Infotab in iviewer now, and find, in the right-hand pane, the link toDataset: . Click on that link. This will bring you back to the webclient.