Import metadata using the Command Line Interface (CLI)
Description
This chapter will show how to import metadata starting from a local CSV file and ending with OMERO.tables on images or Key-Value pairs on images using the Command Line Interface (CLI). For a more user-friendly way of uploading metadata using graphical interface see the Import metadata using the Populate Metadata script in OMERO.web chapter.
This action is typically done after a successful import of images.
We will show:
How to import metadata from local CSV file in a bulk manner and turn them into OMERO.tables on images using CLI
How to turn the OMERO.tables on images into Key-Value pairs on images in bulk manner using CLI
How to import metadata from local CSV file and use a server-side script in OMERO to turn these into OMERO.tables on images
How to construct a simple file to turn the metadata stored in OMERO.tables into Key-Value pairs on images using CLI
Resources
Documentation:
Data: example images from
IDR data idr0021
siRNAi-HeLa dataset
Metadata plugin for OMERO
Bulkmap config yml files defining the various Key-Value pairs parameters, such as the groups and other parameters.
Annotation CSV files define the content of OMERO.tables for each image.
Setup
Metadata plugin installation
Go to the environment where you installed your OMERO.cli as specified under - CLI installation.
Activate the virtual environment.
Run:
$ pip install omero-metadata
Step-by-step
On your local machine, open a terminal
If you did not do so already, activate the virtual environment where
omero-pyis installed or add it toPATHe.g.:$ export PATH=/opt/omero/server/venv3/bin:$PATH
Download the CSV from idr0021-experimentA-annotation.csv if you have access to the idr0021 data in your OMERO.server. Alternatively, download
simple-annotation.csv, which will allow you to work with the siRNAi-HeLa dataset.The variable
$IDbelow is the ID of the Project, in this example case it is the Project containing the idr0021 study. If you are working with the siRNAi-HeLa data, replace in the following example the “Project” with a “Dataset” and theidr0021-experimentA-annotation.csvwithsimple-annotation.csv. To add annotations from a local CSV file to the images in the said Project or Dataset in the form of OMERO.tables, run:$ omero metadata populate --report --batch 1000 --file local/path/to/idr0021-experimentA-annotation.csv Project:$ID
Open your browser and login to the OMERO.web. Navigate to the Project or Dataset you just worked with, expand the “Attachments” harmonica in the right-hand pane and verify that a new attachment is on that Project named
bulk_annotations.
You can inspect its content by clicking on the “eye” icon
 inside the annotation.
Select an image inside the Project/Dataset and expand the “Tables” harmonica in the right-hand pane. These tables contain the appropriate line from the
bulk_annotationsattachment you just created for that particular image.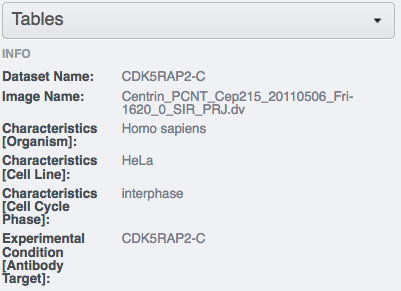
Go back to your terminal. Download the idr0021-experimentA-bulkmap-config.yml file . Alternatively, in case you are working with the siRNAi-HeLa Dataset, download
simple-annotation-bulkmap-config.yml.If you are working with the IDR data, open the downloaded
idr0021-experimentA-bulkmap-config.ymlfile in a text editor and delete theAdvanced options...section. Save the file and run:$ omero metadata populate --context bulkmap --cfg local/path/to/idr0021-experimentA-bulkmap-config.yml --batch 100 Project:$ID
If you work with the siRNAi-HeLa data, open the downloaded
simple-annotation-bulkmap-config.ymland study the comments in the file itself, which will give you hints about how to manipulate the file to fit your particular needs with respect to the resulting Key-Value pairs layout. Make your changes (no need to change anything if you do not want), save the file locally and run:$ omero metadata populate --context bulkmap --cfg local/path/to/simple-annotation-bulkmap-config.yml --batch 100 Dataset:$ID
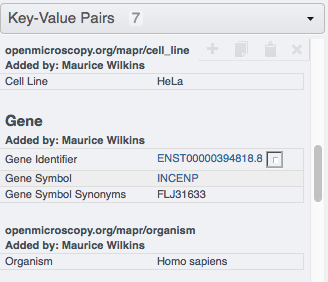
Go to your browser and in OMERO.web, select the images in the Project or Dataset you targeted and verify that they have now new Key-Value pairs displayed in the right-hand pane.