Analyze manually OMERO data using the OMERO plugin for Fiji/ImageJ
Description
The following workflows should work both with ImageJ and Fiji, after these have been correctly set up with the OMERO plugin for Fiji/ImageJ.
Using the User Interface of the OMERO plugin, we will show:
- How to connect to OMERO using the OMERO plugin for ImageJ/Fiji.
- How to open an image from OMERO.server into Fiji/ImageJ.
- How to manually save ROIs and measurements as CSV back to the original image in OMERO.server.
- How to import a newly created image from Fiji/ImageJ into OMERO.
Setup
- Install Fiji on the local machine with the OMERO.insight-ij plugin. The installation instructions can be found at How to install the OMERO plugin for Fiji/ImageJ.
Step-by-step
Example 1: ROIs and measurement creation
In this first example we show how to open an OMERO image in Fiji, draw ROIs, measure those ROIs and show how to save the ROIs and the measurement back to OMERO.
Launch Fiji/ImageJ.
Go to Plugins > OMERO > Connect To OMERO. This will show a login screen where you can enter the name of the server to connect to, the username and password. The OMERO plugin will allow you to browse your data in a similar manner to OMERO.web.
In the OMERO login dialog, click the wrench icon
 and then
add the server address in the dialog. By default, only “localhost”
is listed. Click on the plus icon to add a new line to the list
and type into the line the server address.
and then
add the server address in the dialog. By default, only “localhost”
is listed. Click on the plus icon to add a new line to the list
and type into the line the server address.Click Apply.
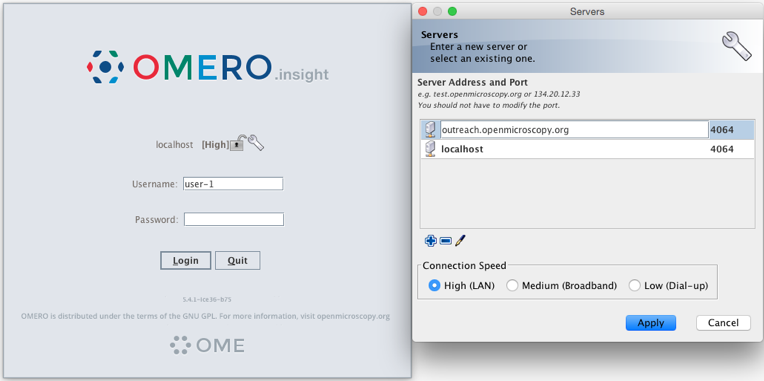
Enter your credentials and click Login.
Select the A-Fiji-dataset Dataset.
Double-click on a thumbnail or on an Image in the left-hand tree to open an Image in ImageJ.
Go to Analyze > Tools > ROI Manager…
Draw a shape using for example the Freehand selection tool.
In the ROI manager, click the button Add [t] to add the shape to the ROI Manager.
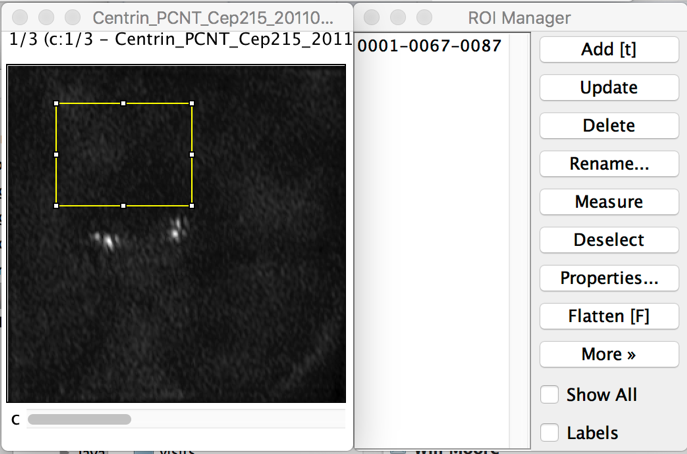
Move to another channel, using the c slider.
Draw other shapes if desired. Click Add [t] to add them to the ROI Manager.
When done with the drawing, click the button Measure in the ROI Manager.
A dialog with measurements for each shape pops up.
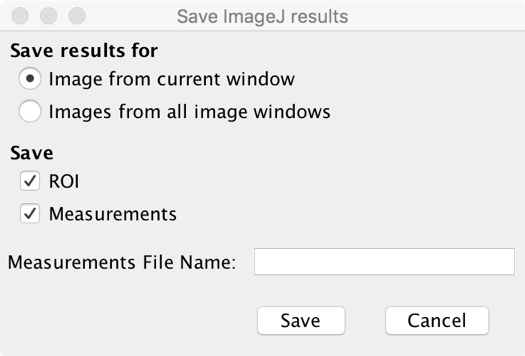
To save the ROI and the measurement back to OMERO, go to Plugins > OMERO > Save ROIs To OMERO.
In the dialog popping up, under the Save section select ROI and Measurements.
The measurements are saved back to OMERO as a CSV file and linked to the Image.
Go to OMERO.web and log in.
Select the image opened in Fiji/ImageJ.
Check that there is a new CSV file under the Attachments harmonica.
Open the image in OMERO.iviewer to the see the ROIs and make sure that you can interact with them.
Example 2: Cropping and import
In this example, we show how to open an OMERO image, crop the image and import the cropped image back to OMERO as OME-TIFF.
In this example we assume that the user is already logged in. If this is not the case, go back to the first step of Example 1.
Select a dataset, for example the A-Fiji-dataset Dataset.
Double-click on a thumbnail or on an Image in the left-hand tree to open an Image in Fiji/ImageJ.
Draw a Rectangle on the Image.
Select the option Image > Crop.
A new Image will be displayed in a Fiji/ImageJ window.
Go to Plugins > OMERO > Save Image(s) To OMERO.
An Import dialog will pop up.

Check that the option Add Image from current window is selected.
Select where to import the cropped Image, for example an existing Dataset, e.g. A-Fiji-dataset. You can also select New From Folder option which will create a new Dataset named with the name of the image you opened from OMERO to Fiji. In case you select No Dataset option, the new image will be displayed in the Orphaned Images folder in OMERO.
Click Add to the Queue button.
Then click Import. The import will start.
When the import is done, go back to the Tree view in the Fiji plugin or OMERO.web. Refresh. Check the new Image.