Data management and cooperation
In this document, we introduce the basic concepts of data management, such as browsing, navigating to others’ data, and changing the display of the images in OMERO. The example here uses OMERO.web, but majority of the features described here are also present in OMERO.insight.
Further, we show how to use the Command Line Interface (CLI) for data management, introducting mainly the features which are not present in the OMERO.web.
Description
We will show:
How to browse data in OMERO.web, navigating to yours and other users’ Images.
How to use the basic layout of OMERO.web for Images organized in Projects and Datasets.
How to use OMERO.web for viewing of High-Content Screening (HCS) data.
How to use the Preview panel.
How to adjust the rendering settings of your and other users’ images from the Preview panel.
How to organize Images in Projects and Datasets.
How to move the data between groups if you are an administrator working on behalf of others.
How to change the ownership of objects.
How to use Command Line for duplicating objects such as Images, Datasets or Projects.
Setup
OMERO.server has been installed and provisioned using an Ansible playbook.
Resources
All data have been pre-imported. For more details, look at data.md.
For the HCS data screenshot, the IDR data https://idr.openmicroscopy.org/webclient/?show=run-5403 were used.
To import Images and metadata, see the maintenance scripts for more details.
For import of Images, we use in_place_import_as.sh.
The cooperation in OMERO is described in Groups and permissions system.
See also the documentation for Moving objects between groups and Changing ownership of objects using the Command Line Interface.
Step-by-Step
Data layout and ownership, usernames (when running a workshop)
All Images have been pre-imported into the OMERO.server. For training purposes, we prepared 50 users on the OMERO.server. Each of these 50 users has their own set of Images. These sets consist of Images of the same name, size, shape, form and quality for each user. Thus, the data of each user appears the same but, in actual fact, are different and totally independent sets. Thus, small discrepancies and differences between the users are completely possible. Further, if one user deletes their own data in OMERO (please do not delete anything on our server), this will not have any bearing on the other 49 sets of Images belonging to the 49 other users.
The login names of the 50 users are “user-x” where x goes from 1 to 50. We have given to each of the 50 users in OMERO a unique first name and surname which we picked from a list of 50 famous scientists e.g. Ada Lovelace or Francis Crick. This is the name (“your” name) which you will see in the top-right corner of the OMERO webclient after you log in with your loginname.
In the OMERO webclient the default view shows only your own Images.
Browsing and rendering
In your web browser, go to the server address provided.
Log in using the username and password provided.
OMERO offers various levels of permissions for groups and users. Depending on the permissions level of each group, a given user might be able to view, annotate or edit data belonging to other users. Permissions are managed by users with admin privileges. To highlight some of the collaborative aspects of OMERO, we will use a “Read-Annotate” group. This implies that users can view and annotate each other’s data but cannot delete other people’s data.
To see other people’s data, click on the (for example
Lab1) group name in the top-left corner of the webclient. Note that in case you are in a differently named group, the name in the top-left corner will accordingly reflect this. Then use the menu to select the name of the group you wish to browse and then the user inside that group whose data you wish to see.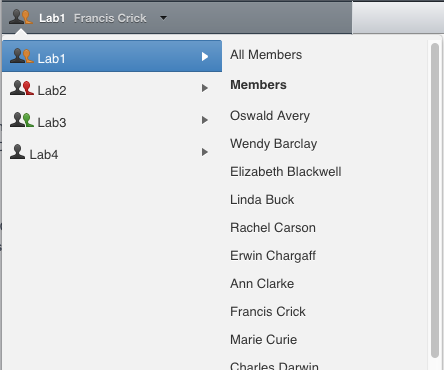
You can browse ‘folders’ in the left-hand pane: Image folders are called Datasets and they are within Projects.
When a Dataset is selected, Image thumbnails are shown in the centre panel.
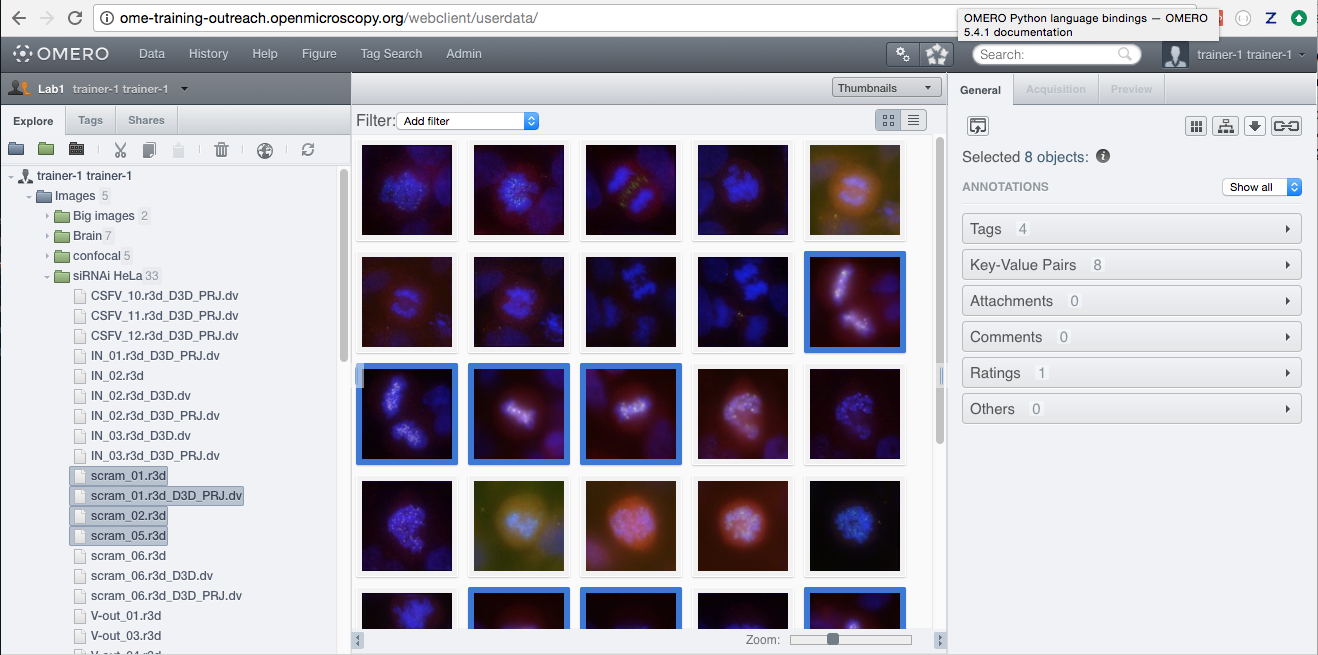
These represent imported Images. The original Images are stored on the server and the generated thumbnails allow us to browse them.
Bio-Formats is used to read the pixel-data and metadata from over 150 different Image formats, including multi-z timelapse Images with many channels, they are referenced as 5D Images. Large pathology and medical Images are also supported.
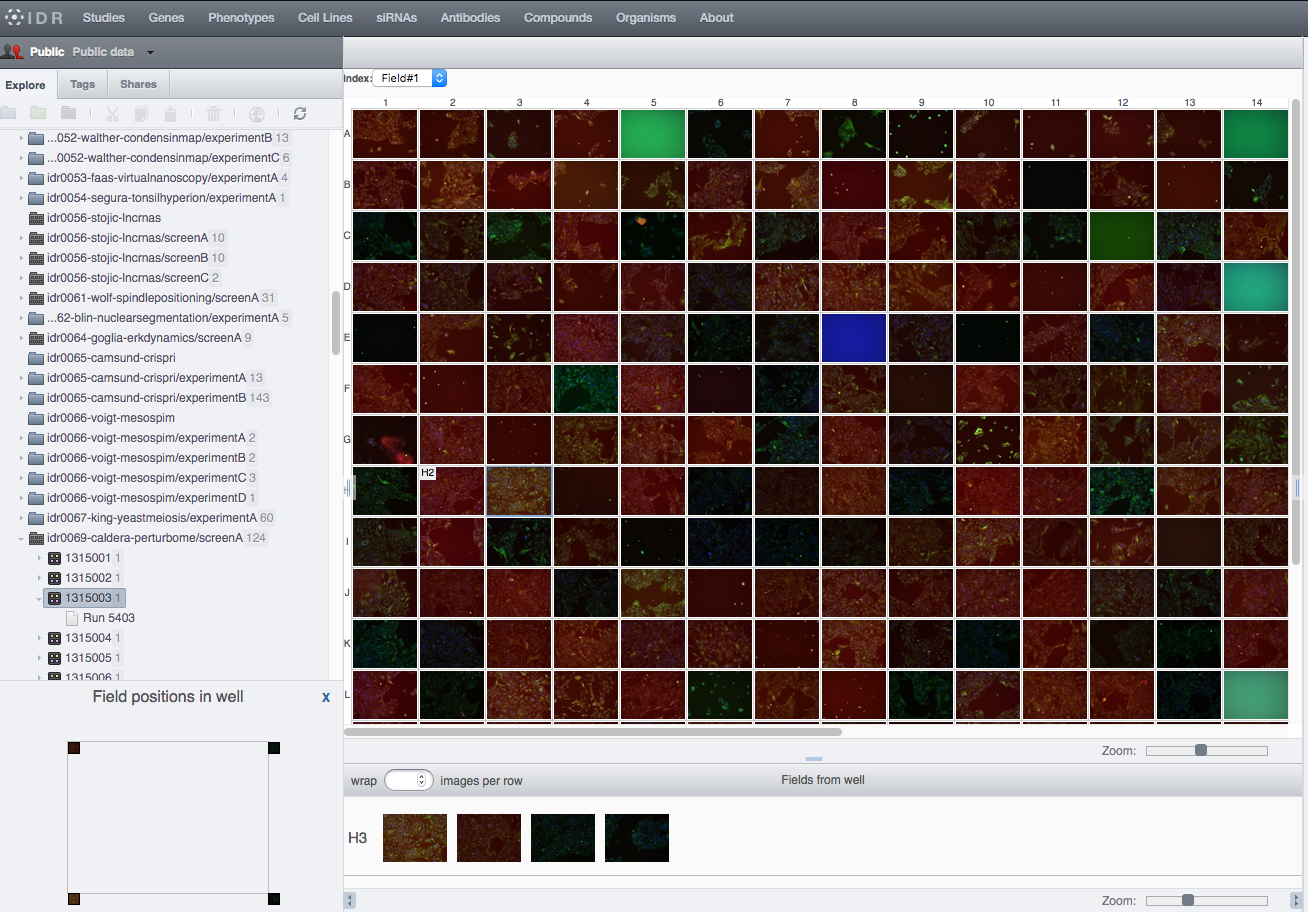
For HCS data, the layout of the OMERO.web is a bit different. The HCS data are usually organized in following manner:
Imagesare contained inWells.Wellsare contained inPlates.Platesare organized inScreens.A
Platemay or may not contain severalRuns.The screenshot below shows the typical layout of a
Platein OMERO.web, where theWellsare organized in rows and columns. ThePlatecontains oneRun. OneWellis selected in the central pane and it contains fourImageswhose thumbnails are displayed below the central pane. The bottom-left corner shows the positions of the Images (calledFieldsin this context) inside thatWell.
Select an Image. In the right-hand pane, metadata read by Bio-Formats and stored in a relational database is displayed:
Core metadata in the
Generaltab.Additional metadata in the
Acquisitiontab.All the metadata read by Bio-Formats can be downloaded at any time.
In the
Previewtab in the right-hand panel, you can also view the Image.For multi-plane Images, sliders allow you to move through Z or Time dimensions.
Viewing Images does not download the whole Image to the client. Only the viewed Image plane is rendered from the original Image file on the server and sent back to the OMERO.web client.
You can adjust the rendering settings for each channel e.g. turn on/off the channels, adjust color settings, look-up tables, etc.
The rendering settings can be saved to the server. This never changes the original Image data and can be reverted at any time.
The rendering settings can also be copied and pasted between Images. To modify the rendering settings in batch, click on the
Save to Allbutton to apply the same settings to, for example, all Images in a given Dataset.You can use the settings which other users saved on your Images and apply them for your own Image. These settings are highlighted as thumbnails in the lower part of the Preview pane.
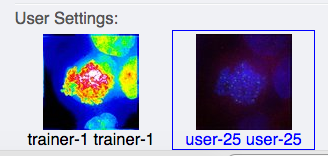
Your own settings are highlighted in blue.
You can revert to the original settings for an Image or Dataset. For example, using the context menu for a Dataset in the tree, select
Rendering Settings > Set Imported and Save.Stay in
Generaltab of the right-nand pane and adjust the channel names:Select any image inside that Dataset and click on the pencil
 icon in the right-hand pane next to Channels.
Input “DAPI” instead of channel “457” and “GFP”, “Aurora-B” and “CY-6” for the other channels.
Click the
Apply to Allbutton and confirm by clicking
 Continue. This will change the channel names of all the images in that Dataset.
Manage Images in Datasets/Projects
You can organize the data in the left-hand side tree by creating new Projects and Datasets. You can link the Images to the new or existing Datasets and Datasets to new or existing Projects. For HCS data, you can create new Screens and link Plates to these Screens.
Use the Project
 and Dataset
  icons above the left-hand
side tree or the right-click contextual menu to create new Datasets
or Projects.
icons above the left-hand
side tree or the right-click contextual menu to create new Datasets
or Projects.Drag and drop Images between Datasets and Datasets between Projects. For HCS data, drag and drop Plates between Screens.
- Copy Images using the right-click context menu:
Select the Images to be copied, then right-click and click
Edit > Copy Link.Select the Dataset you want to copy the Images to, right-click and click on
Edit > Paste Link.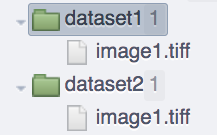
Warning
The Copy Link feature will only create new links
between an Image and a Dataset,
so that one Image becomes linked to multiple Datasets.
This does not create a new independent copy of the Image.
The only way to create a fully
independent copy in OMERO is to use the
Duplicate feature.
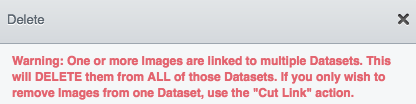
If you delete one of the Datasets, any Images within it that are linked to other Datasets will be retained. Nevertheless, if you directly select and delete an Image that has been copied from another Dataset it will be deleted and lost from both Datasets. There is a clear warning in the OMERO.web when you try to delete such a doubly linked Image, see screenshot below.
Note
Organizing data of other users as an administrator, restricted administrator or group owner is made easier in OMERO.web in the following manner.
If you are an administrator or administrator with restricted privileges working in a group you are not a member of, except for private groups where this workflow is not possible, all containers (Projects, Datasets, Screens) created in OMERO.web in such a group will belong to the user whose portfolio you are working with.
Changed in version 5.8.0: Also the links between the containers and their content will belong to that user. In case there are different owners of the container and of the linked content, then the created link will belong to the owner of the linked content.
This helps to retain the possibility for this user to manipulate their containers even though you created them.
Nevertheless if the workflow is executed by a group owner (i.e. not an administrator), the new links will belong to the group owner and the user will not be able to unlink the objects later. This is a current limitation.
Move data between groups
In OMERO, Users are organized in Groups.
The Groups allow a level of viewing and cooperation between
the members of the group which can be adjusted by changing
the permissions level on that group.
A User can be a member and have their data in one or more
Groups. Thus it is sometimes
necessary to move the data between groups.
This action can be done by the owners of the data themselves
or by an administrator or an administrator with restricted privileges.
Note that caution has to be taken in case the data are linked
to other users’ containers (Datasets, Projects).
If you move only the contents of those containers (Datasets or Images)
and not the containers themselves
(Projects or Datasets), the links between
such containers and the Images or Datasets
which are moved will be deleted.
Further, if any objects are moved,
the links to any annotations
such as Tags or attached File annotations
linked to these objects will be deleted in case these
annotations belong to others or in case these annotations belong
to you but are also linked to some other objects
in the original group which are not being moved.
If you want to retain a copy of your data in its current position, then you should Duplicate it first. The Duplication also bypasses the unlinked annotations problem highlighted in the previous paragraph. Because the Duplicate feature creates new objects, which are not dependent on the originals, the relationships between these duplicates are then preserved even during a subsequent move to another group.
Note that except for using OMERO.web described below, it might be worth in some situations to consider moving data between groups using the Command Line Interface see CLI Moving Objects between Groups.
Move data between groups: owners of data
If you are an owner of the data, you can move the data between the groups you are a member of.
In OMERO.web, select the data to be moved in the left-hand side tree.
Right-click and select
Move to Group....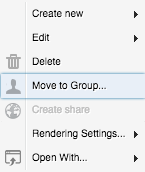
Select the group you want to move the data to.
A message
Checking which linked objects will be movedwill appear and a spinner to the left of it. Wait until the spinner vanishes and a list of objects to be moved and a list of objects which are not included in the move appears.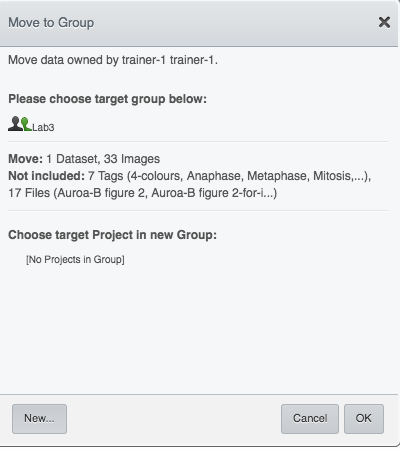
Check both lists. Please read the note above about which objects are typically not included and reconsider the
Moveaction. Thenot includedobjects will not be linked to theMovedobjects anymore if you go ahead with the move, the linkage will be lost.In case you are happy with the
Move``action to go ahead,
select a target Dataset or Project or create a new one and click ``OK
.
Move data between groups: administrators
The administrators can move the data to any group, not only to the group where the owner of the data is a member. Note though that it is not desirable to create a situation where the data belong to someone who is not a member of the group where the data reside.
Typically an administrator works on behalf of other users in a group where the administrator is not a member. For these cases, some features of OMERO.web help to facilitate the moving of data for others (note that these features are not yet available in the Command Line Interface).
Navigate to the data of a user in a group that you are not a member of.
Select the data in the left-hand tree.
Right-click and select
Move to Group....Follow further the steps described in the section Move data between groups: owners of data, taking note of the
Not includedobjects.When creating new Datasets or Projects during the move, note that these containers will belong to the owner of the data, not yourself. Also the links between the new containers and the moved data will belong to the owner of the data. This should help to facilitate a smooth workflow, retaining data-handling possibilities such as reorganizing the data, renaming the containers you created for them etc. for the owner of the data.
Change ownership of data
Every object in OMERO has a single, particular user as an owner. The ownership of objects can be changed but only if you are an Administrator, Administrator with restricted privileges or a Group owner.
There is also a possibility of changing ownership of objects using the Command Line Interface. The Command Line Interface implementation contains some features not present in OMERO.web.
Select a Project, Dataset or Images in the left-hand side tree of OMERO.web.
Right-click and in the context menu, select
Change owner.In the new dialog, select the new owner of the data.
Wait until the
Checking which objects will be movedis done and the spinner vanishes. This might take time depending on the number of objects you are attempting to change owner of. For example, a large number of ROIs on the images can be a cause of longer waiting times.
Check the list of objects which are supposed to be transferred to the new owner. Also consider the possible loss of linkage between objects listed in the
Will be removed fromline.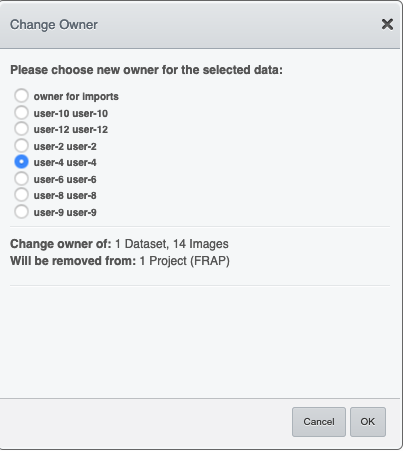
Click
OK.Observe the
Activitiesitem above the central pane of OMERO.web and wait until the change of ownership is finished.
The
Activitiesitem will stop showing a spinner and a link to the data you have just changed the owner of will appear. This link will help you to find the data you just changed the ownership of. This data will be shown as a part of the tree of the new owner in the OMERO.web interface, and are now removed from the old owner tree.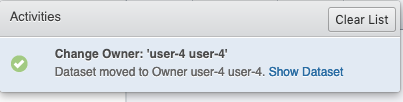
Click on the link
Show ...in the Activities and inspect the data you just transferred the ownership of.
Command Line: Duplicating objects
You can duplicate objects in OMERO. The functionality is available only on the CLI for now. The duplication creates a full copy of the objects as if they were created independently. When desired, the newly duplicated objects can additionally be linked to other objects. When the duplicate is later deleted, it will not have an influence on the original, which stays preserved. Similarly, when the original is later deleted, the duplicate stays preserved as well.
In case of Image objects, which have image files linked, the duplication creates a new image file which is linked to the original image file by a hard link when possible. This means every duplication of an Image increases the number of hard links on the image file in OMERO.server’s Managed Repository, but does not duplicate the image file itself, and thus does not increase the storage demands too much, except for rare cases where the linking is not possible. If creation of the hard link is not possible, the Image duplication will still proceed, creating a full new image file copy.
In case of File Attachment objects though, which also have files to them, each duplication will duplicate the linked file, thus doubling the storage space necessary for these File Attachment files.
Use this Duplicate feature to replace the discontinued Shares feature.
Resources
Necessary software versions:
OMERO.server 5.6.3 or later
omero-cli-duplicate plugin 0.4.0 or later
Documentation:
Plugin for duplication on Command Line:
Setup
Duplicate plugin installation
Go to the environment where you installed your OMERO.cli as specified under Installation.
Activate the virtual environment where
omero-pyis installed or add it toPATHe.g.:$ export PATH=/opt/omero/server/venv3/bin:$PATH
Run:
$ pip install omero-cli-duplicate
Step-by-Step
On your local machine, open a terminal
Activate the virtual environment as indicated in the Setup section above.
The variables
$ID1and$ID2below are the IDs of the selected Datasets. To duplicate two Datasets with their Images and annotations on both the Images and the Datasets, run:$ omero duplicate Dataset:$ID1,$ID2 --report
The duplicated Datasets will not be linked to any Project, even if the originals were linked to some Project.
Duplicate two Images with many ROIs on them. The ROIs duplication might take a long time. To exclude the duplication of the ROIs, run:
$ omero duplicate Image:$ID1,$ID2 --ignore Roi --report
Find the duplicated Images in the Orphaned Images and Drag and Drop them into a Dataset or create a new Dataset for them.
Duplicate two Projects of another user in read-annotate group type. This will duplicate also the Datasets linked to those Projects as well as Images linked to those Datasets. Here we specify some classes of objects that we do not want to duplicate (reference-classes), even though they are linked to the objects we are duplicating. Instead, the duplicated objects will be linked to these reference-classes of objects. We can also specify classes that we explicitly do want to duplicate using the duplicate argument. In this example, we specify all Annotations as reference-classes, but a subset of these (Comments and LongAnnotations such as Ratings) are duplicate-classes. This means that the duplicated Projects will be linked to the original annotations such as Tags, Key-Value pairs and FileAnnotations, but Comments and Ratings will be duplicated. This can be useful to ensure that a single Comment is not attached to multiple objects which might cause confusion when the Comment is edited. Also it prevents a loss of link between the Comment and an object in case that object gets moved into another group after the duplication. The duplicated Annotations and the two Projects with the linked Datasets and Images will belong to the current user (user-1), even if all the original Annotations may belong to other users in the read-annotate group. Run:
$ omero logout
$ omero login -u user-1 -g read-annotate-group
$ omero duplicate Project:$ID1,$ID2 --reference Annotation --duplicate CommentAnnotation,LongAnnotation --report
Duplicate two Projects of another user in read-only group type. The group name in our example below is read-only-group. If the duplicator is not an administrator, administrator with restricted privileges or group owner, they cannot link the annotations of another user to their duplicate in a read-only group. They might duplicate all the annotations (this is the default behaviour) or exclude the duplication of all the annotations by excluding the Link duplication to the relevant objects as shown below. Run:
$ omero logout
$ omero login -u user-1 -g read-only-group
$ omero duplicate Project:$ID1,$ID2 --ignore IAnnotationLink,Roi --report
Note
You must log in to the group where the data are, either by virtue of this group being your default group or by using the -g flag as shown in the examples above, otherwise the omero-cli-duplicate plugin will not find the data. This is a current limitation.
If you intend to move the duplicate into a different group, it is recommended that you duplicate the annotations as well. If you link the annotations from other objects to your duplicates, the link might be deleted during the subsequent move of that duplicate to another group.
Shares (discontinued feature)
Previously created Shares can still be viewed in the Shares tab  above the left-hand side pane of OMERO.web. Nevertheless, the Shares feature is discontinued. It is not posssible to use the
 World icon  above the left-hand pane in OMERO.web to create new Shares anymore. Shares are discontinued in OMERO.web 5.9.0 and later. You need to use the OMERO standard permissions to share Images, by moving the data into the appropriate group. If you also want to retain the Images in their current group, you can first duplicate them as described in Duplicate feature. Nevertheless, this Duplicate and Move workflow has following limitations:
Duplicate is only available on the Command Line Interface (CLI)
You need to already be in a non-private group with the user you wish to share with
You will also be sharing the data with all the other members of that group
Note
Shares were never supported by OMERO.iviewer. If OMERO.iviewer or other viewer which does not support Shares is installed on your server and is set as a default viewer, then users with permissions to access the data in the Share cannot view images in any Full viewer.